
Another release and another bundle of brand new features for you all! The updates this time around are:
- File Storage
- Breaking: Environment Variable Configuration
- Dashboard Editing Improvements
- Deployment History
- New Schema Features
- Minor Improvements
The full details on these are below.
As always, let us know what you think of this in the Convex Discord Community. Many of these features are from feedback we’ve received. Keep it coming!
File Storage
Convex now has built-in support for storing large files like images. Adding things like file upload or profile photos to your app is now a breeze.
To use file storage, you can interact with the new storage interface within queries and mutations.
To upload a file:
- Generate an upload URL using a mutation that calls
storage.generateUploadUrl(). - POST a file to that URL and receive a string storage ID.
- Save the storage ID into your data model via a mutation.
For example, you can generate an upload URL in a mutation like:
export const generateUploadUrl = mutation(async ({ storage }) => {
  return await storage.generateUploadUrl();
});
To download a file:
- Get a download URL with
storage.getUrl(storageId). - Fetch the file from the URL.
To learn more, check out the storage documentation or the storage demo app.
Breaking: Environment Variable Configuration
We’ve changed our recommendation for how to configure your app to talk to Convex.
Previously, we recommended importing the URL of your Convex deployment from a generated _generated/clientConfig.js file. While this was a powerful way to dynamically update configuration, in practice developers found it a little confusing and magical (thanks for the feedback!).
Now our recommendation is to store your Convex deployment URLs as environment variables in a .env file. To transition to this approach:
1. Find your Convex deployment URL.
You can find this URL by visiting the project settings section of the dashboard or by opening the convex.json file in the root of your project where the production url the value for the "prodUrl" property.
2. Add the URL to a .env file at the root of your project.
Your file might look like:
VITE_CONVEX_URL="<production deployment URL here>"
Note that you must pick an appropriate name based on your bundler (many require specific prefixes for security). You can read more about choosing environment variable names in our docs.
We recommend checking this file into your Git repo.
3. Pass the URL into the Convex client.
This may look like:
import { ConvexProvider, ConvexReactClient } from "convex/react";

const address = import.meta.env.VITE_CONVEX_URL;

const convex = new ConvexReactClient(address);
Once again, the syntax for doing this depends on your bundler. For more information, see the docs.
4. [Optional] Add your development deployment to a .env.local file.
Lastly, if you’d like to use npx convex dev to sync your Convex functions to a personal, dev deployment you’ll need to save your dev deployment URL to a .env.local file as well.
The first time you run npx convex dev, it will prompt you to do this. Make sure to use the same environment variable name that you put in your .env file. Your .env.local file should look like:
VITE_CONVEX_URL="<dev deployment URL here>"
This will configure your app to connect to your dev deployment during local development.
We recommend not checking this file into your Git repo because every developer on your team receives their own development deployment. You should add .env.local to your .gitignore file if it’s not already there.
There is a new Configuring Convex doc that covers all of this. If you have any problems getting this set up, let us know on Discord. We’re happy to help!
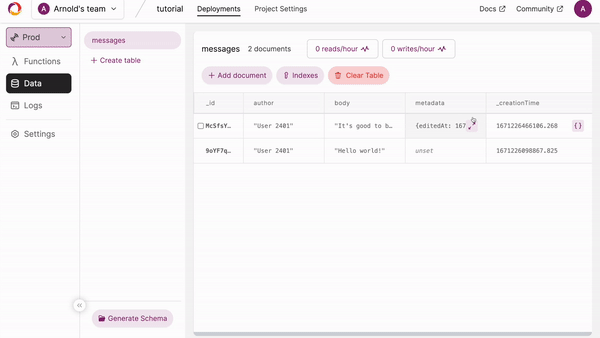
Dashboard Editing Improvements
The Convex dashboard now supports editing objects, arrays and Convex IDs. Additionally you can edit the entire document as a JavaScript object.
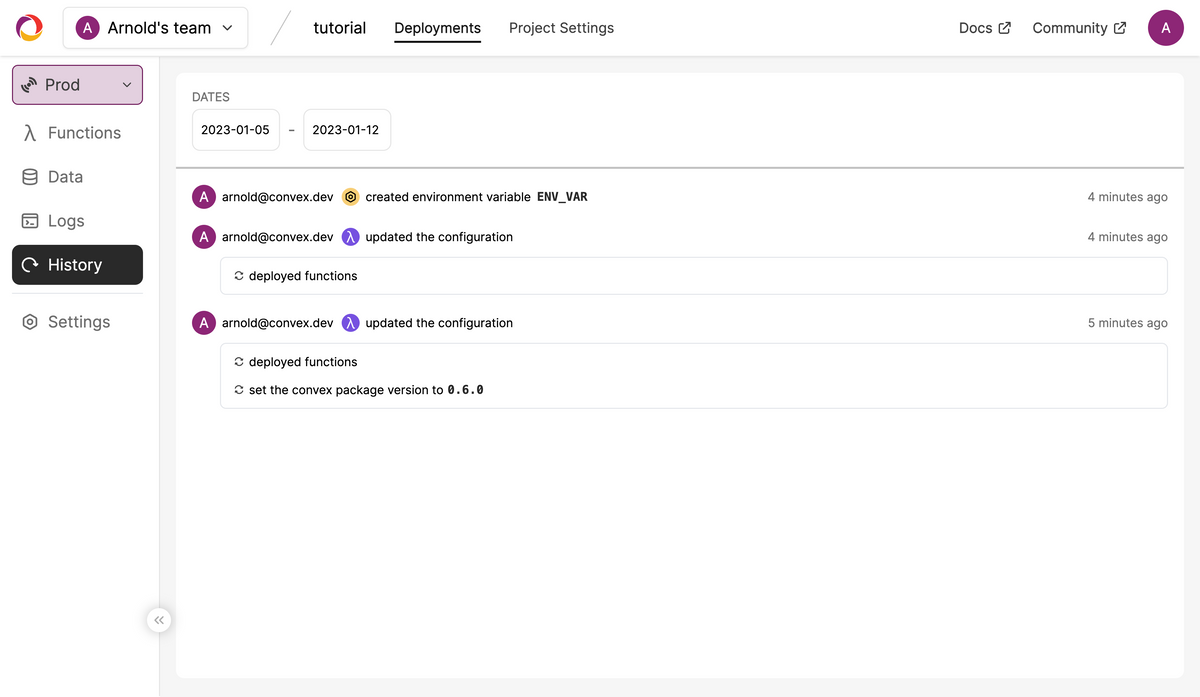
Deployment History
We’ve also added a new "History” section to the dashboard showing a record of changes you’ve made to your deployment. Deployment events are also included on the existing “Logs” page.
New Schema Features
We’ve added two new features to Convex schemas: optional fields and schema strictness.
Optional Fields
If there is a property that only exists on some documents in a table, you can now mark it as optional using s.optional(). For example, you can define a schema with one optional property like:
import { defineSchema, defineTable, s } from "convex/schema";

export default defineSchema({
  images: defineTable({
    imageId: s.string(),
    caption: s.optional(s.string()),
  }),
});
This would resolve to a TypeScript type that looks like:
type Document = {
  imageId: string,
  caption?: string
};
Schema Strictness
By default, schemas are considered strict. This means that the TypeScript type produced by the schema will only support tables and properties explicitly listed in your schema.
Sometimes it's useful to only define part of your schema. For example, if you are rapidly prototyping, it could be useful to try out a new table before adding it to your schema.ts file.
We’ve now added the ability to disable strict mode by passing { strict: false } to defineSchema:
export default defineSchema(
  {
  // Define tables here.
  },
  {
    strict: false,
  }
);
When strict mode is disabled, the schema will permit:
- Using additional tables not explicitly listed in the schema.
- Using additional properties not explicitly listed in the tables.
Breaking: Updated Authentication API
We’ve updated the API for using authentication with Convex to automatically handle resending the auth token when it expires.
If you previously set your authentication token with ConvexReactClient.setAuth(token), you need to switch to a callback API like:
const convex = new ConvexReactClient(...);

convex.setAuth(async () => {
  // Refetch the token from your authentication provider.
  return token;
})
The reason for the change is that the ConvexReactClient will now rerun this function when your authentication expires to grab the updated token.
If you are using the ConvexProviderWithAuth0 to configure your authentication, no change is needed! We updated it for you 🙂.
Minor Improvements
- Added 2 new demos of how to use Convex to sync presence ephemeral data: a facepile and a typing indicator.
- Improved the TypeScript types for paginated queries.
- Improved the error messages generated when querying an index to explain the correct syntax.
- Fixed bugs around using Promises within Convex functions.